Part 1 - Setting up a test Ethereum blockchain, test accounts, deploying Solidity code to the blockchain
What is a Decentralized App (DApp)?
Ethereum is a “blockchain with a built-in fully fledged Turing-complete programming language that can be used to create ‘contracts’ that can be used to encode arbitrary state transition functions”, Ethereum White Paper. If you’re unfamiliar with Ethereum I would recommend reading through the Ethereum white paper to start. There are many resources available online, a few that I found helpful: what is blockchain technology, and a good book focusing on Bitcoin specifically: Mastering Bitcoin.

Our decentralized app will be a simple question & upvoting system with an Angular front-end, Node.js back-end, IPFS for distributed storage, and a smart contract running on our test Ethereum blockchain.
Setting up
MetaMask
To get started we will need to install a few things. First we want to install MetaMask for Chrome. It’s an extension that allows you to run decentralized apps in Chrome, it also organizes your Ethereum accounts and allows you to make & sign Ether based transactions right in your browser.
Once you have installed MetaMask, created a password we’ll need to create a few test accounts. By default there should be an account already created for you called “Account 1” we can use this as one of our test accounts, hit the ellipsis and export private key.
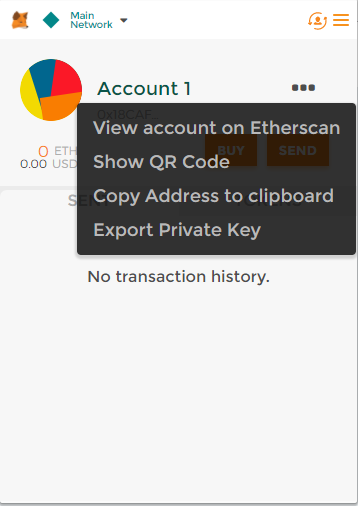
Copy the private key to Notepad. It’s important to never reveal private keys and always double check the site that may be asking for them, in this case we are just using test accounts without any real Ethereum tied to them but it’s good practice to be mindful to keep these safe. I’ve renamed my Account1 on MetaMask, you can do so by hovering over the Account1 name and clicking edit. Now we need to setup another account in MetaMask, so click the top orange button with the little guy and the refresh symbol -> Create Account. Do the same thing we did with Account1, and export & copy the private key to Notepad and rename the Account 2.
Great! now we’ve got our two accounts set up which will simulate two users with Ethereum wallets.
Testrpc
Next, we’ll need to install testrpc github.com/ethereumjs/testrpc, there is a good writeup about the installation and dependency installations for testrpc by Prateesh here: steps-to-install-testrpc-in-windows-10.
Once testrpc is installed we can start the testrpc blockchain. Navigate to your node_modules\.bin\ and run the following command, this is where we’ll need our private keys we exported from MetaMask:
.\testrpc --account="0xprivatekeyforaccount1, 100000000000000000000" --account="0xprivatekeyforaccount2, 100000000000000000000"Substituting privatekeyforaccount1 and privatekeyforaccount2 with the actual private key values you copied earlier. The second argument is the balance we want to give to these accounts in Wei (the lowest denomination of Ether, like satoshi for Bitcoin) Easy way to convert between Wei and Ether here: Ether converter
 Note: Make sure to keep this Powershell window open as it’s running our testrpc blockchain, if you close it you’ll need to run the above command again.
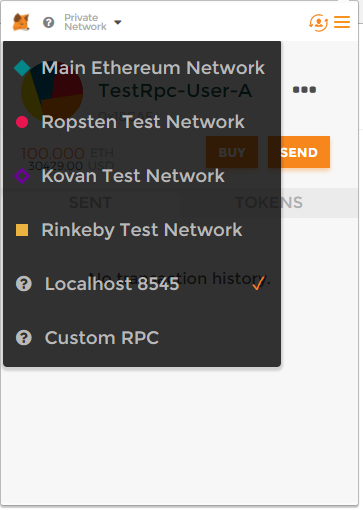
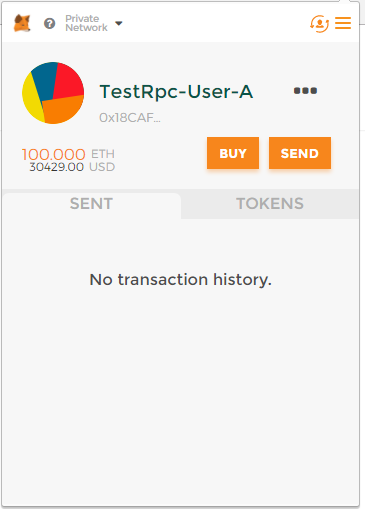
So now both of our test accounts should be populated with 100 Ether each. In order to confirm this go back to Chrome and open the MetaMask extension. You may need to switch between Main Ethereum Network and Localhost 8545 to see the account balance be populated. Once we see the 100 ETH is in our account MetaMask is now talking to our local testrpc chain.
Developing our Smart Contracts
Solidity
ow we’ve got our Ethereum test accounts and test environment running we can develop a smart contract to deploy to this environment. The Solidity Language is used to develop smart contracts for Ethereum, it’s a high-level language and its syntax is similar to JavaScript. This code will be compiled down and deployed to our test blockchain where it will reside in a block and contain a unique address. This address is publicly accessible and can be called by anyone, so there are a lot of security concerns when developing a smart contract. The smart contract is immutable, any time a change needs to be made to the contract you will have to deploy a new copy which will reside in a new block and have a new address. This is why we’re running all of this in a test environment, we won’t worry about deployment costs (Gas/Ether) and can make as many modifications to our contract until we’re happy.
I like the comparison between a smart contract and a vending machine; a vending machine that resides in a specific area carries out a specific set of instructions given the input, I give the machine $1.50 and it returns me a drink - hopefully no more and no less.

A smart contract operates the same way, I navigate to the area (address of the contract), give it input and it either runs a computation or returns me output, no more and no less.
This is the sample contract that I’ve written in Solidity. It’s pretty simple and its main functionality is to keep track of an array of questions which are represented as IPFS hashes, these questions can have upvotes attached to them which grant the user Ether. I won’t go indepth on the syntax but the code is pretty self-explanatory and probably has room for improvement.
pragma solidity ^0.4.11;

contract EthUpVoting {

    struct Question {
        uint qid;
        Multihash ipfsHash;
        int upvotes;
        address user;
    }

    struct Multihash {
        uint8 hashFunc;
        uint8 hashSize;
        bytes32 hashBytes;
    }

    uint8 private questionId;
    mapping (uint => Question) private questionList;

    function EthUpVoting() public {
        questionId = 0;
    }

    function addNewQuestion(uint8 _hashFunc, uint8 _hashSize, bytes32 _hashBytes) public {
        questionList[questionId] = Question({
            qid: questionId,
            ipfsHash: Multihash({
                hashFunc: _hashFunc,
                hashSize: _hashSize,
                hashBytes: _hashBytes
            }),
            upvotes: 0,
            user: msg.sender
        });
        questionId += 1;
    }

    function voteForQuestion(uint qId) public {
        questionList[qId].upvotes += 1;
    }

    function getQuestionTextAtIndex(uint _qId) public constant returns (uint8, uint8, bytes32, int, uint, address) {
        var foundQuestion = questionList[_qId];
        if (foundQuestion.ipfsHash.hashSize == 0) {
            return;
        }
        return (foundQuestion.ipfsHash.hashFunc, foundQuestion.ipfsHash.hashSize,
            foundQuestion.ipfsHash.hashBytes, foundQuestion.upvotes, foundQuestion.qid, foundQuestion.user);
    }

    function getUpvotesForQuestion(uint qId) public constant returns (int) {
        return questionList[qId].upvotes;
    }

    function getQuestionListSize() public constant returns (uint size) {
        return questionId;
    }

}
Copy this code into a new file with the .sol extension. Now we need to compile and deploy this contract code. We can do the compilation using Node.js and the solc npm package and the deployment using Web3. Install solc using npm npm install solc, do the same with Web3:
npm install web3 in this post I’m using Web3 1.0.0-beta.24 which is still in development and has a few bugs to deal with, but it seems that Web3 1.0 is the “future-proof” way to go here.
Compiling & Deploying our Smart Contract
I’ve written this Node.js script to compile & deploy the smart contract to our testrpc chain, you can copy and use it as well. After it’s run it will output the ABI definition and the contract address.
var Web3 = require('web3');
var fs = require('fs');
var web3 = new Web3(new Web3.providers.HttpProvider('http://localhost:8545'));

var code = fs.readFileSync('EthUpVoting.sol').toString();
var solc = require('solc');
var compiledCode = solc.compile(code);

var abiDefinition = JSON.parse(compiledCode.contracts[':EthUpVoting'].interface);
var EthUpVotingContract =  new web3.eth.Contract(abiDefinition);
var byteCode = '0x' + compiledCode.contracts[':EthUpVoting'].bytecode;

EthUpVotingContract.deploy({data: byteCode}).send({
    from: '0x18caf47eae63e35e7266890f8b5b4bb83a28e915',
    gas: 1500000,
    gasPrice: '3000000'
}, function(error, transactionHash){ })
.on('error', function(error){  })
.on('transactionHash', function(transactionHash){  })
.on('receipt', function(receipt){
   console.log('ABI Definition: ' + JSON.stringify(abiDefinition));
   console.log('contract address: ' + receipt.contractAddress) // contains the new contract address
})
.on('confirmation', function(confirmationNumber, receipt){  })
.then(function(newContractInstance){
    console.log() // instance with the new contract address
});
In the line from: 0x18caf47eae63e35e7266890f8b5b4bb83a28e915x', fill in the public key of one of your MetaMask accounts.
Execute this Node script in a new terminal window. If the code ran successfully and deployed our smart contract we should get the following output:
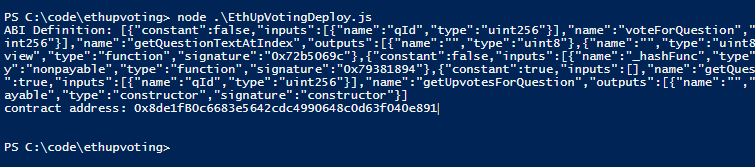
We will want to keep track of the ABI definition and the contract address that were outputted for Part 2.
Ho-kay, so now we’ve successfully deployed our contract to our testrpc blockchain, as I said before this contract resides at an address and that’s how you will interact with it. A little note about our deploy script, it was sent as a transaction from an Ethereum account (in this case my MetaMask account I first set up), it also was sent with gas, this gas is a payment in the form of Ether for creating a transaction and including it in the next block. Gas is used for every transaction or interaction a DApp has with a smart contract, if the gas used is too low then the transaction will fail, if it is too high the gas that was used will be subtracted and you will be reimbursed the remainder. Gas for Ethereum is a hot topic of debate and it will be interesting to see how gas prices fluctuate with Ethereum being more widely used.

Conclusion
That’s all for Part 1, we’ve set up our test blockchain, our test accounts and successfully deployed a smart contract. In Part 2 I will get more into how we could use IPFS with our smart contract, how an Angular app can interact with our Node.js back-end and retrieve/send data to our smart contract.